La Manga Petalo

Hola mis estimados amigos,

Recientemente hice una falda de lineas blancas y negras que estoy segura le va a gustar a todos, mas sin embargo no podia dejar de hacer una blusa que la acompañara, en especial ahora que estoy haciendo un purgue en mi closet;  a muchos les dara curiosidad saber respecto al tema, pero solo se trata de sacar la ropa que no estoy usando y solo dejar la ropa que en realidad uso.

Bien, para esta falda, decidí hacer una blusa de color negro y mangas de la tela de lineas a blanco y negro; pero para que la blusa tenga un poco de personalidad, he diseñado las mangas en forma de petalos.

Aqui les publico una foto para aquellos que no tienen mucha idea de como es!

Primero he disenado la manga:
  1. en la foto de abajo pueden observar en toda la mitad de la manga una linea que la divide, esa linea es la union  que normalemente se hace al coser la manga.  En este caso denota la costura.
  2. esta manga parece un par de alas, asi que la ala de la izquierda es la parte de la manga que se cose a la parte posterior de la blusa, alli veremos los dos indicadores o notches que indican es la parte posterior y el shoulder point que es el punto del hombro.  el punto del hombro es el huesito mas pronunciado que tenemos al subir y bajar el brazo.
  3. en la ala de la derecha podemos observar los mismos detalles pero correspondientes a la parte de adelante de la blusa.


Aqui ya tenemos la manga petalo cortada con las dos capas de tela, el forro y la tela fashion.  Yo las tengas unidas al reves de ambas telas con alfileres porque al coser estas telas muchas veces se deslizan haciendo dificil la costura.
Nota: si tu manga petalo es de una sola capa de tela, solo tienes que hacerle el falso y ya esta. 


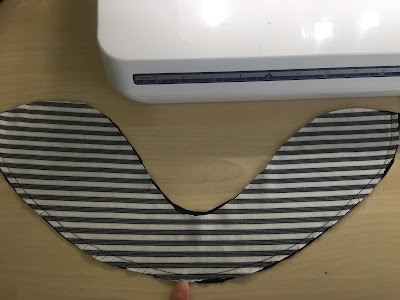
Ahora el siguiente paso es coser las dos capas de telas por todo el  borde del falso, como indico en la foto de abajo con mi dedo;  Solo se va a coser el borde de abajo.
tambien quiero connotar que al ser esta costura de curvas le he hecho cortes desde el borde de la tela hasta antes de  la linea de costura. (no he cortado el hilo)


Ahora procedo a hacer una costura baja o under stitch;  El proposito de esta costura es mantener el forro de la manga hacia adentro en su puesto, para esto se hacen los siguientes pasos:
  • abramos la manga separando la tela fashion del forro
  • luego con la mano hacemos hacia el lado del forro la tela entre costuras.
  • y por ultimo vamos a coser la tela entre costuras a 0.3 milesimas de la linea de costura. pueden observar en la foto de abajo a la derecha la linea de cosutra y la de la izquierda es la linea de costura baja.


al voltear la costura hacia el forro debe quedar como la foto de abajo.


Ahora que ya tengo las dos lados izquierdos de las telas juntos, procedo a coser la manga por el lado superior de esta porque al coserla a la blusa corre el riesgo de deslizarse y quedar mal.


Ahora el siguiente paso y el ultimo, es buscar el punto del hombro (shoulder point) y unir este punto de la parte posterior de la manga con la del frente. Es simplemente ponerlo uno sobre el otro pero coincidiendo en el punto del hombro.  Por ejemplo:


Ahora que ya estan unidas por el punto del hombro, coserla para que la manga quede cerrada y lista para pegarla a la blusa.  Esto es todo, abajo les publicare las fotos de mi top ya terminado y no olviden comentar que tal quedo!


Esto ha sido todo, espero les guste y hayan aprendido algo nuevo u obtenido una idea para un futuro proyecto.


Suscribete a mi blog y Dios les Bendiga a todos!  Tengan una excelente semana.

petal sleeve

Hello my dear friends,

Recently I made a stripe black and white skirt that I am very sure everyone is going to like, but this year I decided to purge my wardrobe and I am doing that while sewing the new one.  I know many of you wonder how exactly I am doing that?! well, I am going to get ready of clothes that I really don't wear and sew new clothes that match my style.
So for my skirt, I decided to make a black top with stripes sleeves, but not just that, I wanted to add some personality to my top and designed petal sleeves for it.

Here is a picture of the sleeve for those who don't have much idea; So pretty much is a normal sleeve that divides in two and overlaps.

First, I design my the sleeve. 
  1. You can see in the attached picture a line in the middle of the sleeve that divides it, that is the line where usually I will put together the sleeve in the underarm. 
  2. Since it looks like wings, let's say that the left wing is the part of the sleeve that goes to the back armhole of the shirt, I have written down the shoulder point that is the most prominent point of your shoulder and where the petal sleeve should overlap.
  3. you can also see the 2 notches indicating that is the back sleeve
  4. in the right wing you will see the correspondent notes for the front armhole, shoulder point and the one notch.


Now we have the sleeves out of the fabric; I decide to make my petal sleeves with a black linen like the skirt, and I put right side of the stripe fabric with the right side of the black sleeve. 

I used to pins to hold together my fabric because sometimes fabric slips while sewing layers.
In the next picture, I have sew together both layers of fabric right sides together all the way through the bottom of the sleeve, only the bottom.
Note: if your petal sleeve is only one single layer of fabric, you only have to do the hem instead.


Make sure and cut to and not through from the edge of the fabric to  the sewn stitch line. 
Before having wrong sides of the sleeve together to attach it to the shirt, I did under stitch my sleeve. The purpose of under stitching my sleeve is so the fabric under won't try to curl up in the sleeve, so making the under stitch will keep the black fabric nit and stayed in place. 

Under stitch steps: 


  • Open the sleeves linen away from self fabric.
  • place the seam allowance toward the linen fabric, in this case the black fabric.
  • start sewing in the seam allowance about an 1/8 from the stitch line, the picture above will give you an idea. 
here is how it looks in the linen side:


Now, I have my wrong sides together and I stitch again my two layers of the sleeve but this time at the top so they won't move when I will attach the sleeve to the shirt.


After the last step above, I just need to find the shoulder point notches in my sleeve, overlap the sleeve and sew together the 4 layers of fabric again so you can finally attached the sleeve.

There are my two sleeves left and right overlapped and ready to be attached to the shirt.  
Now you will attach the sleeve as a very usual sleeve, just remember where is the shoulder point and where the front and back sleeve come together in the under arm.

 This is my final product, I hope you guys liked and learn something new or have new ideas.


Subscribe to my Blog and God Bless you all! Have a nice week.

Fascinated for this skirt

This skirt made of wool, it has been in my closet for a while now, I have always loved it because I can be casual with a T Shirt or elegant with a button shirt.  
To make this skirt of of the simplicity pattern 2451 I did make some adjustments, for example I like that my skirt hugs my hips and flare around my knees.

Truth to be told, I love this pattern from day one and I would love to make another fancy skirt, once I am finished exploring some of my favorite patterns.


La tela de esta falda es de un tipo de lana que luego de procesada, se convierte en una tela muy fina y es perfecta para climas fríos.  Esta falda ha estado en mi closet for algunos años ahora y es una de mis favoritas. La puedo usar con una blusa de algodón o con una camisa de botones y pasar de casual a elegante.
Para hacer esta falda use el patrón de simplicity 2451pero claro le hice algunos ajustes, por ejemplo me gusta que me entalle en las caderas y que caiga en biés en las rodillas.

Para decir la verdad, ame este patrón desde el,primer día y me gustaría volver a hacerlo una vez que termine de explorar algunos de mis patrones favoritos.


Díganme que les parece este outfit del día! No olviden suscribirse para estar atentos a mis post nuevos!
 God Bless you and don't forget to subscribe to receive my new posts, your comments are always welcome.

Swimsuit Vogue Pattern 9192

  Sew with my this cute swimsuit piece and enjoy some of the tips I provide to have an amazing final product.    In this video I will show y...