How to reupholster a glider
Hello my dear friends, today in the blog is a small tutorial about how to reupholster a glider or a nursery rocking chair. I decided to make this tutorial because I have seen so many tutorials in Pinterest about how to do it and honestly, I would love to contribute with more professional tips to people looking forward to make this project. I am not an arrogant person but honestly there are things that I would not post in the internet if they look like a toddler did it.
Be Aware, it is going to be a long tutorial for the many pictures that I took to have full details of the project.
sewing notions:
- Fabric: upholstery fabric bought at Jo Ann's for $5 dollars the yard on sale ( you need 3 yards)
- threads: all sewing thread and I recommend a heavy duty one, the same color and use it on top.
- microtex needles : good for leather, coated materials and laminates.
- 8 heavy duty snaps: size 5/8"
Here is a before picture of the Glider
It has gone throw the 3 years and 10 months of use with water and milk spills that regardless how much I cleaned it, it had spots and it is embarrassing. Oh! I will regret this later but I am definitely very honest and I wanted to show you that the redo was necessary indeed!
Let's Start
To start, lets us take off all the stitching of the cushions as well as taking pictures of the pieces so you can remember how to put them together once you have all apart.
this is the arm of the chair with the pockets.
this goes in the arm of the chair, other side.
The back cushion of the chair.
And the seat!
Detail to keep in mind on the round corners of the cushion seat.
I take a look at the inside of the pillow to check if it is necessary to replace them, but mine seems to be in great shape.
Inside filler of the cushion that goes in the back.
the cushion of the seat
I will use my old fabric as a pattern in the new chair
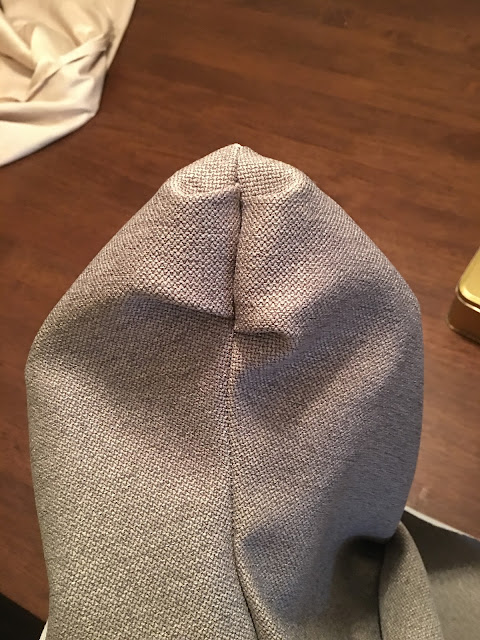
Back of the chair, it is round at the top and definitely I will keep it the same way. Those little details make a big difference.
- Just place your old fabric on top of the new one and cut in the outside of the line.
- measure your seam allowance
- go to the sewing machine and put this one together.
Now the seat!
Remeber this round corner?
I am going to give details to make it exactly the same.
find the pleats and mark where it ends as well the inside of it, usually they look like a dart.
take my picture as an example.
please mark all of them.
also you can make little cuts where the dart meets as another sort of reminder.

Honestly it doesn't hurt to take all sort of precautions.
where the fabric meets you can make little dots so you know how to gather them later.
Here is my seat cushion with the darts already open.
also you can see where my green dots are, so they are another of my guide to put them together or to transfer them into my new fabric.
Time to use it as a pattern for the seat.
you want to make likes of the pleats, here in my picture I have all of them marked, but the most important are the one in the green dots.
You can do as you more please but the green dots could be just enough.
This is how it looks!
I make sure to transfer all the green dots in boths side of the two pieces of fabric and in the 2 corners of the seat.
Here I have put my green dots together and it is starting to take shape.
Put the two pieces of fabric right side with right side or self fabric together and start to get ready to sew the whole thing.
Keep in mind the corners are round!
A beautiful look of the pleats!
Here I have reinforced my fabric with the serger machine, just because I love to do it, but it is not necessary. My old fabric didn't have it.
Here it is a look of my corners finished.
Now I will be working in the arm of the chair
I didn't post more pictures of this part because most of it is a flat sewing and I have cover the pleats subjects above.
for this part I will need to use heavy duty snaps size 5/8" and I will need 8. also I have two threads of the same color, one heavy duty and the other a normal sew all fabrics.
This is the needles I used for this project and all my sewing notions I bought them at Jo Ann fabric store in Georgia.
Here you can see that my back cushion has lines and that is definitely something I added to make the back cushion steady and not saggy. It definitely solved that issue. You might see some white dots in the cushion made with my tailor chalk that I need to Iron to remove them.
I hope this post get to help some of you that are challenged to make old things look like new and forget about the home made sayings.
Let me know what do you think about the project and the tutorial, don't forget to follow me in the social media like Facebook, Instagram and Jo Ann's app.
God Bless you all!


