New Upholstered Glider

How to reupholster a glider


Hello my dear friends, today in the blog is a small tutorial about how to reupholster a glider or a nursery rocking chair.  I decided to make this tutorial because I have seen so many tutorials in Pinterest about how to do it and honestly, I would love to contribute with more professional tips to people looking forward to make this project.  I am not an arrogant person but honestly there are things that I would not post in the internet if they look like a toddler did it.

Be Aware, it is going to be a long tutorial for the many pictures that I took to have full details of the project.


sewing notions:

  • Fabric: upholstery fabric bought at Jo Ann's for $5 dollars the yard on sale  ( you need 3 yards)
  • threads: all sewing thread and I recommend a heavy duty one, the same color and use it on top.
  • microtex needles : good for leather, coated materials and laminates. 
  • 8 heavy duty snaps: size 5/8"

Here is a before picture of the Glider 

It has gone throw the 3 years and 10 months of use with water and milk spills that regardless how much I cleaned it, it had spots and it is embarrassing. Oh! I will regret this later but I am definitely very honest and I wanted to show you that the redo was necessary indeed!


Let's Start

To start, lets us take off all the stitching of the cushions as well as taking pictures of the pieces so you can remember how to put them together once you have all apart.

this is the arm of the chair with the pockets.


 this goes in the arm of the chair, other side.


The back cushion of the chair.

 And the seat!

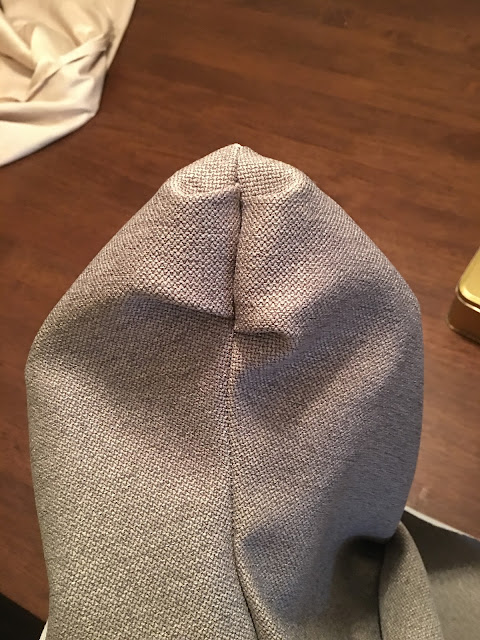
Detail to keep in mind on the round corners of the cushion seat.


I take a look at the inside of the pillow to check if it is necessary to replace them, but mine seems to be in great shape. 


Inside filler of the cushion that goes in the back.


the cushion of the seat


I will use my old fabric as a pattern in the new chair

Back of the chair, it is round at the top and definitely I will keep it the same way. Those little details make a big difference.
  • Just place your old fabric on top of the new one and cut in the outside of the line. 
  • measure your seam allowance 
  • go to the sewing machine and put this one together.

Now the seat!

Remeber this round corner? 

I am going to give details to make it exactly the same.


find the pleats and mark where it ends as well the inside of it, usually they look like a dart.
take my picture as an example.

please mark all of them.


 I personally measure my dart as well so I make sure when I am putting all together that is going to be the same.

also you can make little cuts where the dart meets as another sort of reminder.


Honestly it doesn't hurt to take all sort of precautions.

where the fabric meets you can make little dots so you know how to gather them later.


Here is my seat cushion with the darts already open.

also you can see where my green dots are, so they are another of my guide to put them together or to transfer them into my new fabric.


Time to use it as a pattern for the seat.
you want to make likes of the pleats, here in my picture I have all of them marked, but the most important are the one in the green dots.

You can do as you more please but the green dots could be just enough.


This is how it looks!


I make sure to transfer all the green dots in boths side of the two pieces of fabric and in the 2 corners of the seat.


Here I have put my green dots together and it is starting to take shape.


Put the two pieces of fabric right side with right side or self fabric together and start to get ready to sew the whole thing.  
Keep in mind the corners are round!


A beautiful look of the pleats!


Here I have reinforced my fabric with the serger machine, just because I love to do it, but it is not necessary.  My old fabric didn't have it.


Here it is a look of my corners finished.


Now I will be working in the arm of the chair

 To make the arm of the chair is exactly the same procedure as doing the seat, I took care of the pleats and used my old pieces of fabric as a pattern for my upholstery.
I didn't post more pictures of this part because most of it is a flat sewing and I have cover the pleats subjects above.


for this part I will need to use heavy duty snaps size 5/8" and I will need 8.  also I have two threads of the same color, one heavy duty and the other a normal sew all fabrics.


This is the needles I used for this project  and all my sewing notions I bought them at Jo Ann fabric store in Georgia.


 Here I present to you my project finished and with the little details as the old chair that make it look more professional.


Here you can see that my back cushion has lines and that is definitely something I added to make the back cushion steady  and not saggy.  It definitely solved that issue.  You might see some white dots in the cushion made with my tailor chalk that I need to Iron to remove them.


I hope this post get to help some of you that are challenged to make old things look like new and forget about the home made sayings. 
Let me know what do you think about the project and the tutorial, don't forget to follow me in the social media like Facebook, Instagram and Jo Ann's app.

God Bless you all!

Shirt for Him

Ultimate guy gift

 Hello my dear friends, today in the blog is this amazing man shirt for a change.  If you were out of ideas for last moment Christmas, birthday or valentines gifts, I really would recommend this cool and easy pattern man shirt.


  • the pattern is: McCall's M6044
  • sizes: from 34 to 56
  • fabric store: www.fabric.com
  • fabric recommendations: cotton, cotton blend, washed denim. 
  • pattern variations: you will find this cool pattern with back yoke, pockets with  flaps or without them, short and long sleeves. So it definitely works good for all year round or all kind of weather.

Pattern Review

I love it and I want to make some more of them for my husband as soon as I have more time to sit down in my sewing machine, I love giving him gifts that I can make with my hands and the best of it, is that he goes around so happy and proud telling everyone that I made the shirt for him.   ๐Ÿ˜‡๐Ÿ˜‡
  • His shirt is made in a light weight denim and actually it keeps him very warm now in the winter season of Georgia.  
  • I didn't have to make any changes in the pattern to make him fit perfectly, so I love it.
  • It does have a good length for those guys that enjoy wearing the shirt out of the pants.
  • It has enough easy for him to move around comfortably.
  • would I recommend this?:  Yes, indeed!
  • would I make this pattern again?: yes, I just need the time.
 I really hope this post gave you a good idea of an awesome gift for him or them! don't forget to subscribe to my blog and to follow me in the social media. 

Happy Holidays and God Bless you!๐ŸŽ„๐ŸŽ†๐ŸŽ‰


Tecnica de Ajuste para Pantalones

Tecnica para ajustar los bigotes de gatos en pantalones

Hola mis estimados lectores, gracias por estar de vuelta a mi blog.  Hoy les traigo un tutorial el cual encontras muy interesante y para algunes sera un choque al darse cuenta que por tanto tiempo hemos estado usando pantalones que no han sido los mas correctos para nosotros. 
La razon de que esto nos suceda a algunos y a otros no, es simplemente por que la industria de ropa hace los mismos pantalones para diversos tipos de cuerpos, no nos pueden quedar igual a todos.

La foto de abajo te mostrara cual es este fastidioso problema y que es muy comun de verlo en los pantalones de algunas personas, usualmente es el problema mio.

Quiero hacerles la salvedad que los pantalones Jeans son muy diferentes y en toda la industria de ropa los Jeans tienen mayor flexibilidad en las reglas de ajustes.
 

P: Cual es la razon para que algunas tengamos este problema? 

R: muchas mujeres tenemos lo que se llama pierna atletica o muslo protuberante en los cuadriceps.


Como solucionar este problema?! 


En la foto de arriba y abajo encontraras una guia exacta para resolverlo.

  1. tratar de hacer ajustes en la parte del tiro es muy dificil, asi que tu puedes hacer un corte en la linea de pliegue en la zona del muslo.  Hacerlo solo en una pierna
  2. Muy suavemente abra un poco el corte realizado.
  3. Mida el espacio abierto.
  4. Agregue mitad de la medida al tiro delantero y la otra mitad al tiro posterior y rehaga la linea del tiro hacia la pierna.

Pudistes ver la diferencia en mis pantalones despues de haber realizado el corte en el muslo? En realidad ese es mi problema y lo que mas me gusta es que finalmente tengo forma de como arreglarlo. Ahora seguire en mi camino a hacer los pantalones perfectos y sera en poco tiempo que pueda traerles unos patrones comerciales que les facilite hacer el poder hacer los ajustes.  

Gracias por volver y leer el articulo, espero lo disfruten y les sea de mucha ayuda, seria un placer traerles otro tutorial respecto a estos pantalones, si tienen dudas no olviden de preguntarme y sera un placer poder ayudarles.  No se olviden de seguirme en las redes sociales que encuentran en la pagina principal del blog.

Dios te Bendiga xxoo!

Pant Fittings - 1

Technic for the cat whiskers at the crotch 


Hello my dear readers, welcome back to my blog.  Today I bring to you a tutorial that maybe some of you will find it interesting and some others will be shocked to find out that for years we have been wearing pants with fitting issues.  
The picture below will show you one very annoying fitting issue that is very common to see around and definitely it is the one with which I struggle the most.
I want to make a salvation; Jeans are very different pants and in the whole pant styles library, Jeans get the most forgiving rules about fitting. 

Q:   Reason for this cat whiskers in the pants? 

A:  women that have athletic legs which means the quadriceps are protuberant or some just call it protuberant thighs are most likely to have this issue.
Also another reason why some of us happen to have this problem, is simple because the industry make the same pant pattern for thousands of women all with different body shapes and we can not expect all of us to have the same issues. We are all perfect in different shapes but with the same type of pant. That is why I like to make my own clothes.


How to solve this issue


In the picture above and below you will find a guide of exactly what to do.

  1. Fitting under the crotch is difficult, so you can slash pant along creaseline at the upper thigh and just in one leg.  
  2. Gently  tug pant leg to allow the slash to open.
  3. measure the open space.
  4. add half of the measured amount to each inseam and blend to the knee.


Do you notice any difference in my pants after the slash in the leg?  That was exactly my problem and I was very happy to have it fixed.  Now I will continue my journey in my pants making and very soon I can bring to you a couple of patterns that you can work with and that will make your life easier to make corrections, Right now I am working on it when I have the time to entertain myself. 

Thank you for coming back and reading this article, If you like my blog don't forget to subscribe so you will receive each post in your email and follow me in my social accounts that you find in my home page. 

God Bless you xxoo!

Ojales

De vuelta a las bases - Haciendo ojales

Estos tutoriales los he titulado de vuelta a las bases y son especiales para aquellos que por primera vez toman una maquina de coser y estan llenos de curiosidad.  Mi deseo es poder llegar a aquellos que muy poco sabes de costura y que piensan que puede ser difcil, aunque en realidad es lo mas divertido, al menos mi hijo de 36 meses y yo lo vemos asi.

Necesitas :
  • Hilo 
  • carrucha
  • pie especial para hacer ojales
  • el boton de la medida a hacer el ojal 
  • Tu proyecto!


Marca el lugar en tu camisa o proyecto donde deseas coser tu ojal, ten seguridad de hacerlo a la medida correcta, por ejemplo los ojales son siempre 0.3 cms mas grandes que el boton, y aunque es una medida muy pequena, en realidad es efectiva y necesaria cuando trabajes con telas gruesas como denim.


Escogi de la variedad que tengo, un ojal que tiene puenta redonda en vez de aquel rectangular.
Si tu  maquina de coser no es tan electronica como la mia, vas a encontrar como hacer tus ojales por pasos y estos estan ubicados en el boton de la maquina que lleva toda las puntadas.
Por ejemplo en la foto de abajo puedes ubicar las puntadas 4-16  a la 4-19  esas mismas figuras las encuentras en el boton principal de tu maquina; solo tienes que hacer un paso y al terminar cambiar o rodar hacia la proxima puntada.


Aqui es donde sucede la magia para que tu maquina haga el ojal de la medida adecuada.  Posiciona el boton en el espacio indicado y asegurate de que esta completamente cerrado sin moverse del lugar.
Ahora ya esta listo para poner el pie de ojales en la maquina y comienza a coser.


Aqui esta mi primer ojal de los 12 a seguir!

making button holes

Back to Basics - Making Button holes


I have named these tutorials to come back to basics and the purpose of them is to get to those people who are for first time working in a sewing machine, I want you to know that the process is not completely difficult but instead is wonderful and lots of fun at least that is the way my 3 years old baby and I see it.

All you need is :
  • Thread 
  • Bobbin
  • special button hole foot for your machine
  • The button in the size you will be working on
  • Your shirt!


Mark the place where you will be sewing your button holes, also make sure the size is correct.  Button holes are 1/8" bigger than the button going through them.


Choose the button hole shape you want, here I like the oval ending instead of the rectangle.
If your machine is not as updated as mine, in one of the button of your machine you will find how to make yours button holes by steps. 
For example in the picture below you can find numbers 4-16 to 4-19 in the screen of my sewing machine and those are exactly the same figures you will find in the button of your sewing machine, you only have to position your wheel in the step you need once your are finished with the previous one. 


Now and very important the button foot; you can see where I placed my button making sure it is tight close and ready to attach to the machine.


Here my Job all done!


tweed Jacket

Hello my dear friends, Here I am again with a vogue pattern and the famous tweed jacket. I don't know what happens with me but I am such a vogue pattern lover, I honestly go just for it most of the time but, I am opening my ways to new searches and wonderful pattern makers that other people like you talk about them in Instagram and your blogs.

The reason behind this jacket is very simple, in a vacation many years ago to Panama beach I saw that cute fabric store and after so much bridal fabric I found this one and it was the last remaining of it, so as many of you I grabbed all and walk to the car as proud as I could be, so after that came the idea of the jacket one day while searching classes in craftsy and I saw my teacher has one very similar to mine, so it was a must and finally it is here. 

If you ever get to my closet you will find plenty of blazers, it is part of my outfit statement if that is possible.  I do have blazers for running, to make outfit with my jeans, to work and just the fact that gives me a hint of elegance while wearing jeans.


I love this fabric and its many colors, maybe many of you din't imagine that it could combine with a very bright yellow shirt but in the threads of this tweed there are pink, black, blue, green and obviously yellow that makes this jacket a runner of many outfits. 
my main idea is to wear it with a black sheet dress that I haven't made yet and that I need it so bad..... 


About the pattern, if you see it, take it! I love it.  I can not tell you that I had to make any changes to it.  Most of the work is related to the fabric that you use; also it has a wonderful princess seams that make any adjustments a breeze.  The sleeve pattern is a 2 pieces sleeve so it is very easy but if you are looking for a sleeve with the 3 pieces you can adapt it or I might suggest the patterns from 2 amazing designers:

  1. Claire Shaeffer
  2. Susan Kalje
There are plenty of options out there for an amazing, cute and loving project.  My next step is to make the black dress and a skirt of the same tweet fabric... All I need is time.

Don't forget to tell me what do you think about it and follow me in my social media.  God Bless You!

Cross Strap Dress

Hello my friends, today in my blog is this dress that I am so excited to present to you!
I have been working in this wonderful pattern from the designer Nicola Finetti from Vogue V1498 and I am so happy to tell you all about it and the process to the result in the pictures that you will find attached below.

To begin with, once I saw this wonderful pattern, all I wanted was to make it, so my instincts took my to Joann fabric store and  let me tell you that once I saw this amazing and cool fabric I was hooked.  This is a knit wool, the fabric is medium weight with approximately 20% stretch, it has a charcoal color, soft to the touch and to work with it is a dream.  I went back to JoAnn's store for more fabric, I thought I would love some pants in this fabric, well, it was gone.  So I most probably would have to search it in internet.


About the pattern, I going to provides the following notes:

  1. I am 5' 6" and this pattern is quite long in me, if I make another dress I must shorten the length.
  2. the pattern calls for Knits fabric like ponte Knit, gabardine, pique and by working with it, I don't find the need for the knits fabrics because with the big leg opening, you get plenty of allowance to move.
  3. I had to reduce this pattern in the sides by 1/2" all the way in the seam allowance.


I must tell I loved this pattern and the result but there is something I totally will change and it is in the lining; there is a piece of this pattern that will hang from the waist where there is not support, so instead Next time I would make and extension so It will be sewn under the breast area and avoid the line at the waistline when walking.

Overall this is a wonderful pattern but the first time it was like trying to solve a puzzle, maybe there are plenty of you guys out there that sure are smarter than me to make this one pain free, but that was the only complain I had, I which the pictures would have been much more helpful.
I am going to attach some pictures of the inside of the dress so you would have an idea of how much is behind that you can not really see.


Let me know what exactly do you think about the pattern, the pictures, the outfit and don't forget to follow me in facebook and Instagram.  You would find the links under my profile here in the blog.

Have a nice day and God Bless you all!

Swimsuit Vogue Pattern 9192

  Sew with my this cute swimsuit piece and enjoy some of the tips I provide to have an amazing final product.    In this video I will show y...